September 30, 2026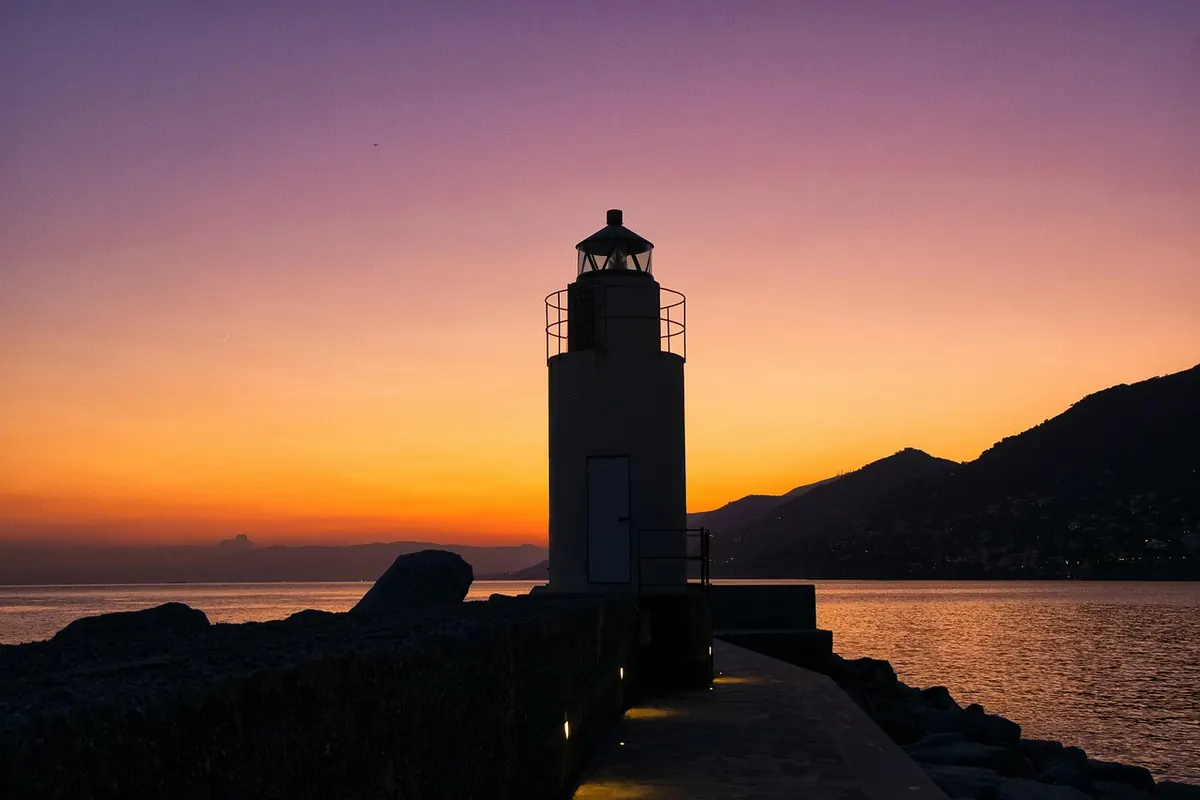
A lighthouse is one of the few subjects that looks better as a black shape than it does in full detail. Strip away the whitewash, the rust streaks and the painted railings, and what remains is what the eye actually remembers: a tapering tower, a lantern room, a figure on the gallery. Shot against the light, the building becomes a graphic — all profile and proportion. The technique is simple in principle and unforgiving in practice. Miss the exposure by a stop, or leave the tower merged into the headland behind it, and the picture collapses into a flat grey rectangle.
Part of the appeal is that a lighthouse is already a diagram of itself. Few buildings are so purely geometric: a circle that narrows, capped by a smaller circle, crowned with a dome and a finial. Photographers spend whole afternoons hunting for a clean line through a messy scene, and here the subject hands it to you — provided you remove the one thing that normally makes a coastal photograph attractive, which is light falling on the building. You are not photographing a lighthouse. You are photographing its outline against the sky. Once that reframing settles in, the decisions become easier.
Find the backlight
A silhouette only exists because the light is behind the subject. Stand so that the sun, or a bright bank of cloud, sits behind the lighthouse: the tower then blocks the brightest part of the sky, and the contrast does the work.
Two windows of the day do the heavy lifting. At sunrise and sunset the sun sits low and close to the horizon, so a tower on a headland to your east or west lines up almost by itself. Midday sun is too high to hide behind a building — it arches over the top and lands behind your own shoulder, which gives you the flat, front-lit postcard you were trying to avoid.
Check the geometry before you drive anywhere. A sun-position tool, or simply a compass on your phone, will tell you the bearing of the sun at the hour you plan to arrive. Then ask which side of the tower you need to stand on. In winter the sun rises and sets far to the south of east and west; in midsummer it ranges much further north. A spot that works in January can be hopeless in July, and vice versa.
Clear skies are not the only option. A bright band of cloud with the sun burning just above or below it gives a softer, more painterly backdrop and often a longer usable window, because the light is spread over a wider area. What you need is brightness behind the tower, not blue sky behind it. A grey day with a luminous white horizon is a silhouette day; a grey day with a dark ceiling is a wasted trip.
Expose for the sky, not the tower
This is where most attempts fail. Your camera is far more intelligent than the scene deserves. Left to its own devices it will evaluate the whole frame, notice that a huge black building is dragging the average down, and politely brighten everything until the tower goes mid-grey and the sky goes white. Silhouettes are not a case for trusting the meter.
- Meter off the brightest sky. Point the camera at the clear sky beside the lantern room, lock exposure, then recompose. In spot mode this takes a second; in evaluative mode you may need exposure compensation instead.
- Underexpose deliberately. Start at one stop below what the meter suggests and check the histogram. The tower should be pinned to the left edge; the sky should sit in the right half without clipping.
- Ignore any detail you can see through the viewfinder. If the railing looks like a railing, you are overexposing. A true silhouette has no readable texture, only an edge.
- Bracket if the light is changing. Three frames at one-stop intervals cost nothing and rescue the shot when the sun slips behind a cloud between metering and pressing the shutter.
Shoot raw. Silhouettes live or die on the shape of the tonal curve, and a raw file gives you the headroom to push the blacks back down and pull the sky back up later, even when the camera's own contrast setting has flattened both.
Separate the shape from everything else
A silhouette is only legible if it has a clean edge. The most common failure is not exposure at all — it is a tower that has merged into a dark cliff, a dark tree line, or a darker band of cloud. Once two black shapes touch, they read as one, and the picture becomes a lump.
A silhouette is not a dark photograph. It is a photograph made entirely of edges.
Fix it with your feet.
- Move sideways. Two or three paces left or right can swing the tower clear of a ridge that was behind it a moment ago. This is almost always more effective than any lens change.
- Get low. Kneeling or lying on the ground drops the horizon, lifts the tower against open sky, and reduces the amount of land competing for attention.
- Use water. A tower with its reflection below it, both rendered black against a glowing sky, doubles the shape and adds a second line of interest.
- Find a gap. Shooting through a doorway, a rock arch, or a slot between two headlands frames the silhouette and gives the eye a reason to stop.
- Wait. If a cloud is sitting exactly behind the lantern room, you have not missed the picture — you have simply arrived early. Clouds move fast at altitude.
Negative space is your ally. A silhouette surrounded by empty, luminous sky is stronger than one crammed between a cliff and a cloud bank, and a plain sky is not boring — it is the ground the shape stands on.
The human element, and the problem of scale
A lighthouse photographed alone is a shape. A lighthouse photographed with a person on its gallery is a story. Silhouettes are the only genre where figures cost you nothing: no faces caught in an awkward expression, no clashing colours, just a clean outline that tells the viewer how big the building is.
Look for someone on the walkway, a fisherman on the rocks below, a dog, a gull, a boat crossing the frame. All of them read instantly as silhouettes and all of them add a sense of proportion the tower alone cannot supply. If nobody is there, wait ten minutes. Somebody usually is.
The same logic applies to foreground. A gate, a railing, a wire fence, a single wind-bent tree at the edge of frame — anything with a distinctive outline anchors the composition and keeps the tower from floating in the middle of an empty rectangle.
Field checklist
- Confirm the sun's bearing and the time it clears the horizon.
- Position yourself so the tower blocks the brightest part of the sky.
- Walk the scene before you set up: look for a clean edge and a clear gap.
- Meter the sky, underexpose, and check the histogram after every change of angle.
- Bracket three frames at one stop apart.
- Reframe low or loose enough that the tower has room to breathe.
- Shoot until the sun actually drops, not until the light merely looks good.
That last point matters more than it sounds. The finest silhouettes happen in the ten minutes after the sun has gone, when the sky holds its brightest tones and the land has gone fully black. Most photographers pack up while the sky is still improving. Stay.
Finishing in the edit
The silhouette is largely made in camera, but the edit decides whether it sings. Pull the blacks down until the tower is genuinely solid, then lift the highlights slightly to give the sky presence. Increase contrast rather than saturation — colour is barely relevant here, and over-saturated sunsets start to look synthetic. Crop ruthlessly: a strong silhouette wants a clean frame, and any stray branch or rooftop in the corner is worth cutting away.
Finally, resist the urge to recover detail in the shadows. The whole point is the absence of detail. A silhouette that reveals a faint window or the ghost of a railing has forfeited the graphic power it was built on — and left you with a photograph of a lighthouse that happens to be dark, rather than a shape that could belong to any lighthouse, anywhere, at any time in the last two hundred years.
Photo: dexmac / Pixabay